The post SMS API: Send forms over SMS text with airSlate’s Document Automation Hub API appeared first on airSlate Blog | Business automation.
]]>airSlate’s Document Automation Hub API allows developers to build, using code, a wide variety of functionalities for processing and sharing documents. If you have a workflow that involves a document and you want to use an API, consider using the Document Automation Hub API.
Using the Document Automation Hub API, you can build workflows that send forms in a variety of ways. This tutorial and this tutorial illustrate how you can embed a form on a mobile-friendly webpage, and also how you can send a form by email.
These tutorials explore multiple use cases of sending forms — a patient onboarding application and a park facility booking application. Hospitals and clinics are some of the most common real-world users of airSlate, and recreational facilities also use airSlate.

An even larger number of airSlate’s users are in the insurance industry, the focus of the tutorial in this article. In the workflow we will describe, users receive an SMS text message that they can fill out a form to obtain a life insurance quote. Sending forms by SMS text is another feature airSlate supports.
Sending forms by SMS messages
The workflow this article will illustrate is for sending SMS text messages to prospective customers of a life insurance company. It is as follows:
- The prospective customer is sent a promotional SMS text message, with a link to a form they can fill out to receive a life insurance quote.
- The prospective customer fills out the form.
- If the form is submitted with all required fields complete, the prospective customer receives a thank-you SMS text message with a link to the completed form.
You will need a device set up to receive SMS text messages, as well as a registered Document Automation Hub account. You will also need to have Python installed — this tutorial, in one section, uses Python 3 to run data parsing commands.
Authenticating with the API
It’s time to set up the API so you can make your first Document Automation Hub API requests. Go to the dashboard of your Document Automation Hub account and create a new application with the “Add Application” button on the top left, as shown below:

The application name is unimportant as long as you remember it. It should also be unique. Here, I’m naming it “Document Automation Hub Demo.” The application URL is even less important for this application, and I’m pointing it to the airSlate domain.
Once the application is created, click on its name where it appears on the Document Automation Hub account dashboard. You will get to a page that, going forward, this tutorial will call the application page. It shows the client ID; client secret; application URL; and “Code Grant,” “JWT Grant,” “Implicit Grant,” and “Password Grant” tabs.
The next step is to get an access token for an Implicit Grant, a special string enabling access to the API. An Implicit Grant is a type of authorization grant in which the access token is obtained directly, via a URL string. It is different from some other types of authorization grants, in which the authorization code obtained through the URL string would be exchanged for an access token as an extra verification step.
An Implicit Grant is chosen because the application handles individual users, with the information only moderately confidential. The form the prospective customer fills out is intended to be quick and user-friendly rather than comprehensive, personal, and precise.
The prospective customer enters information such as name, basic contact information, the type of life insurance plan they may be interested in, and a bit of self-reported physical and health information. The health information is a free-text description intended to be approximate rather than exact, that is not stored in an individual’s record.
To get an Implicit Grant access token, click on the “Implicit Grant” tab on the application page. At that tab, copy the “Link to get the access token” and enter it into the browser. Log into your account at the “Link to get the access token” URL and, once logged in, obtain the access token from the URL string. The access token is the entire part of the URL string between access_token= and &auth_outcome=logged-in. To test whether you have obtained a working access token, enter the access token into the “Token” field of “Auth” on this page. Specify that the API request is going to the “Main (production) server,” and click “Send API Request.” You should receive a “200 OK” response.

As we have just demonstrated, the Document Automation Hub API’s documentation has the unusual, highly convenient feature of enabling API requests to be made directly on the documentation pages. This can help developers use the API to set up workflows more efficiently.
Now that you have access to the API, it’s time to use the API to build the document automation capabilities.
Creating the Insurance Company’s Workspace
First, you will create the insurance company’s workspace as an organization that can store and run its own document workflow automation processes. Go to this “Create a new Organization” page, enter your access token in the “Token” field of “Auth,” specify that the API request is going to the production server, and enter the following in “Body”:
{
“name”: “Rabee Life Insurance”,
“subdomain”: “rabee-life-insurance”,
“category”: “INSURANCE”,
“size”: “0–5”
}
Once you finish forming your request, click “Send API Request.” If the response successfully creates the organization, save the organization ID, which you will use in future requests.
If the subdomain is taken, you will receive a 422 “Unprocessable Entity” error as a response and will need to enter another subdomain. Although the application built in this tutorial uses the subdomain “rabee-life-insurance,” it should not be a big deal to use another.
The Document Automation Hub API Guide’s pages for specific requests also include the code for making each request in various programming languages — cURL, HTTPie, WGet, Python3, the Requests library of Python, JavaScript, Node, Go, C, Objective-C, OCaml, C#, Java, HTTP/1.1, Clojure, Kotlin, PHP, Powershell, R, Ruby, and Swift. So, you can embed API calls into almost any existing piece of code.
And now, if you go via browser to the subdomain you indicated in your request — for this tutorial, https://rabee-life-insurance.airslate.com/ — you will see an actual, empty workspace. Time to add some document automation.

Organizations, Templates, and Workflows
The workspace is described as the Organization in the API documentation. You can make many types of Document Automation Hub API requests to build automated document workflows within it. These automated processes are handled and run using special structures we can create within the Organization, called Templates and Workflows.
A Template is a group of fillable documents and forms that can be sent to recipients for completion. Templates require all their forms to be included when they are sent to a recipient. For this application, we are sending out one form for prospective customers to request a life insurance quote. As a result, we will only need one Template.
A Workflow, which used to be called a Flow, is a single run of the standard back-and-forth process for a Template’s documents and forms. For example, each time a person is hired, they might receive a different copy of the standard employment contract. A new Workflow might be created for each new hire, to send the contract to the new employee and their manager for signature.
We will create a single Workflow in our Template each time we send out the life insurance quote request form.
Creating the Template and uploading the Form
The next step is to create the Template for holding the life insurance quote request form. Go to “Create a new Template” in the documentation. Fill in your access token in “Token” and your organization ID in “organization_id.” Send the API request to the production server with the following body:
{
“name”: “Life Insurance Quote Request”
}
Upon receiving a successful response to your API request, make sure you save the template ID for future API calls. Or, you can get a list of Templates in your Organization here. With the Template created, we can now add the form to it.
The form comes from the Document Automation Hub API form library, which includes over 400 sample forms for a wide variety of purposes. You can get this full list of forms by making a request to “Get a list of form templates” here, filling in your access token and organization ID, and indicating that the response should return 500 results per page.
In case you were confused, the “Form templates” are not the same structure as the “Life Insurance Quote Request” Template we have just created. Going forward, we will call the “Form templates” forms when referring to their functionality and documents when referring to their structure.
We will use a Python script, either on the Python Shell or in a file, to make the API request to obtain the ID of the form you want to upload — the “Responsive Life-insurance Quote Form.” This script is based on the code available in the API documentation to make a “Get a list of form templates” request in Python 3.

Here is the full Python script. Write your access token instead of <your access token> in variable ACCESS_TOKEN, and your Organization ID instead of <your organization ID> in variable ORGANIZATION_ID.
import http.client
import json

ACCESS_TOKEN = "<your access token>"
ORGANIZATION_ID = "<your organization ID>"

conn = http.client.HTTPSConnection("api.airslate.io")

headers = {
   'Accept': "application/json",
   'Authorization': "Bearer " + ACCESS_TOKEN
}

conn.request("GET", "/v1/organizations/{}/forms/templates?per_page=500".format(ORGANIZATION_ID), headers=headers)

res = conn.getresponse()
data = res.read()

json_string = data.decode("utf-8")
f = json.loads(json_string)
forms = f['data']

for form in forms:
   if (form['title'] == "Responsive Life-insurance Quote Form"):
       print(form['id'])
       break
The script prints out the ID of the “Responsive Life-insurance Quote Form.” Be sure to save this form ID for future API calls. You will use it for your next API call, uploading the form to the template.
To make this call, go to “Create a web form” in the documentation. Fill in your access token, the Organization ID, and the Template ID. Put the following request in “Body”:
{
“name”: “Responsive Life-insurance Quote Form”,
“form_template_id”: “<form ID>”
}
where <form ID> is the ID of the “Responsive Life-insurance Quote Form” you obtained in the previous script. Send the API request to the production server. Now the form should be uploaded to the Template.
Setting up the Form
Go to the Organization subdomain for your organization — for the organization created in this tutorial, http://rabee-life-insurance.airslate.com. You should now see, in the left menu bar under “Recents,” a “Life Insurance Quote Request.”
Click on this “Life Insurance Quote Request” in the left menu bar. Then click “Configure” at the top right of your screen. You should see, in the bottom left, that the “Responsive Life-insurance Quote Form” has been uploaded.
The screen should show an editable Workflow setup, where you can add and remove steps in processing the form. It should look something like this.

On this screen, you will hook up the Workflow so it actually sends text messages to recipients.
Making form fields required
At the bottom left of the screen, click on the three dots at the right of the “Responsive Life-Insurance Quote Form.” A menu will pop up, where you can select “Open document.” You will see the form, editable in the browser. Click on “Assign Fields” to Recipient 1 to close the popup.
Click on the field “Full Name.” A “Properties” menu will appear on the right. Select from that menu that the “Full Name” field is “Required.” You should now see a red star to the right of “Full Name,” above the text field.
Repeat by clicking on the following fields and selecting “Required,” to make the following fields required: “Street Address” (leave “Street Address Line 2” as optional), “City,” “State/Province,” “Zip Code,” “Country,” “Phone Number,” “E-mail,” “Birth Date,” “Which Life Plan?,” “How much life insurance do you want us to quote?,” “Height,” and “Weight.”
Leave “Street Address Line 2” and “Describe any health issues?” as optional. Click “Continue” at the bottom of the screen. The changes you have made to the form will be saved, and you will return to the editable Workflow setup.
Enabling Forms to be sent
We are setting the form to get sent automatically. To do so, click “Add autostart” near the top of the screen. Click again on “Add autostart” on the popup that appears on the right, and select that you would like a “Scheduled start.”
Set the time you want to receive the form. Here, I set it to 9:30 PM US Eastern time. Then, I selected that I wanted to repeat having it sent “Multiple times,” sending it every 24 hours and stopping sending after 7 occurrences. I also selected “Notify Admin every time a document is sent.” Click on “Apply changes” and then on “Apply.”
Next, you will indicate that the form should be sent to your number. On the step that says “Recipient 1,” select that you want to send the form by SMS by selecting “Phone,” and enter your number. Be sure the country flag shows the correct country.

Then click the gear on the top right of the step with “Recipient 1,” and a menu will pop up on the right of the screen. Click “Recipient” on that menu. Enter the following “Happy Spring” message in “Customize Message,” before the link to your document. Then click “Apply.”
Happy Spring! Spring into Spring with Rabee Life Insurance. Fill out this form for a quote:
Next, click on the “+” below the step with “Recipient 1” and above “Completed.” Select that you want to add a new “Step.” You will see another step for “Recipient 2” appear. As you did for the step with “Recipient 1,” select that you want to send the form by SMS by selecting “Phone,” and enter your number. Note that “Recipient 2” is the same as “Recipient 1.”
Click on the gear on the step with “Recipient 2.” Click “Recipient” and enter the following “Thank you” message in “Customize message,” before the link to your document:
Thank you for requesting a quote from Rabee Life Insurance! A representative will get back to you. For your records:
Click on “Conditions” on the right-side menu, which is below “Recipient.” You will see that the step occurs “When document data” “Revision status” “is completed.” Click “OR.”
For the new condition that appears, select that the step occurs when, for “Responsive Life-insurance Quote Form,” “All required fields” “is not empty.” In other words, the filled-out form is sent back to you with a thank you message once you have submitted it with all the required information.

Finally, click “Apply.” Congratulations, you have set up the workflow!
At the bottom of the editable Workflow setup, you can click on “Test” to send the form as a test to your email address, and “Publish” to finalize the Workflow.
Running the Workflow
In addition to the scheduled sending of the form, you can also run the workflow immediately upon request. When you click on “Responsive Life-insurance Quote Request” on the main page of your Organization, you will see a “Run Workflow” button. Click on it.
If you entered your phone number correctly, you should receive an SMS text message with the “Happy Spring” message you wrote, and a link to fill out the form. Upon filling out and submitting the form, you should receive an SMS text message with the “Thank You” message you wrote.
If you’ve gotten to the end of this tutorial and built out this application, congratulations! Enjoy this tulip garden and check out some other features in airSlate’s Document Automation Hub API.

The post SMS API: Send forms over SMS text with airSlate’s Document Automation Hub API appeared first on airSlate Blog | Business automation.
]]>The post Forms API: An easy-to-use API for mobile-friendly web forms appeared first on airSlate Blog | Business automation.
]]>airSlate is regularly recognized as a provider of some of the best document automation software. Its form automation services are used by numerous companies and organizations, who can testify to their effectiveness. The UK-based swimming school In at the Deep End (IATDE), for example, automates its sign-up and birthday party reservation processes with airSlate. Its new sign-up process includes the pre-filling of forms with participant data and the automatic saving of forms. Its new birthday party reservation process automatically keeps track of which time slots are available. IATDE has saved money and time on paperwork, and quickly built a system customers have described as forward-thinking.

Another example is T2 Biosystems, a company specializing in in-vitro diagnostics. airSlate literally helps them saves patient lives with form processing. The ability to save partly completed forms reduces their back-and-forth, speeding up diagnosis and treatment in the hospitals that use T2 Biosystems’ technologies.
Want to create mobile-friendly no-code web forms using airSlate’s drag-and-drop editor? This post is all you need. Our tutorial will show you how to create forms with the Document Automation Hub APIs, and how to use the Document Automation Hub so processing your forms is easy as pie.
For the purpose of the tutorial, let’s create an app for booking a picnic area, to run on your local server.
Booking the Picnic Area
The application to book the picnic area will include forms, PDFs, and eSignatures. To make the booking:
- The user fills out a web form.
- After submitting the form, the user signs a waiver sent in an email.
- A park staff member signs that they have reviewed the full application, and indicates whether the application has been approved.
- The waiver is stored on the park facility’s server as a PDF.
The application will run on your local machine using Python’s SimpleHTTPServer. To use SimpleHTTPServer, you will need to have Python installed — this tutorial uses Python 3. To use the Document Automation Hub APIs, you will also need a registered Document Automation Hub account.
Setting up the Local Server
In the directory of your choice on your local machine, create a folder called picnic_area containing two files: index.html and thankyou.html.
We’re leaving the file index.html blank for now. Later, we will embed the first form in our document automation process into that page. Submission of that form will redirect you to thankyou.html. Put the following code in thankyou.html. It’s based on Andy Brewer’s MVP template, and you could probably copy and paste it. Here’s the code:
<!-- MVP.css quickstart template: https://github.com/andybrewer/mvp/ -->

<!DOCTYPE html>
<html lang="en">

<head>
   <link rel="icon" href="https://via.placeholder.com/1x1">
   <link rel="stylesheet" href="https://unpkg.com/mvp.css">

   <meta charset="utf-8">
   <meta name="description" content="Landing page after submitting first part of application to reserve picnic area">
   <meta name="viewport" content="width=device-width, initial-scale=1.0">

   <title>Thank you!</title>
</head>

<body>
   <header>
       <h1>Thank you for your interest in booking the Blue Hills Park picnic area!</h1>
       <p>You will be emailed a waiver to sign.</p>
       <p>Upon signing and sending the waiver, you will hear from a park staff member within three business days.</p>
       <p>They will let you know if your application has been approved.</p>
   </header>
   <main>
           <!-- Image source: NewtonCourt, CC BY-SA 4.0 https://creativecommons.org/licenses/by-sa/4.0, via Wikimedia Commons -->
           <img alt="blue-hills-park" src="https://upload.wikimedia.org/wikipedia/commons/8/87/Blue_Hills_P1140207.jpg" style="display: block;margin-left: auto;margin-right: auto;width: 80%;" />
   </main>
   <footer>
       <hr />
       <p>
           <small>
               Questions? Contact airSlate at <a href="https://www.airslate.com/contact?utm_medium=article&utm_source=blog&utm_campaign=document_automation_hub_api&utm_content=10_2023-Forms_API_An_Easy_to_Use_API_for_Mobile-Friendly_Web_Forms&utm_term=thankyou_page">this link</a>.
           </small>
       </p>
   </footer>
</body>
</html>
In the main picnic_area directory, run the local server on the command line. My local machine is a Mac, and my command is as follows:
$ python3 -m http.serverOnce the server starts, navigate in your browser to http://localhost:8000/thankyou.html, and the page should look like this:

Now you have some nice pages to embed your forms in and redirect the user to on completion, so we will switch to building the actual document automation processes.
Authenticating with the API
It’s time to set up the API so you can make your first Document Automation Hub API requests. Go to the dashboard of your Document Automation Hub account and create a new application with the “Add Application” button on the top left, as shown below:

The application name is unimportant as long as you remember it. It should also be unique. Here, I’m naming it “Document Automation Hub Demo.” The application URL is even less important for this application, and I’m pointing it to the airSlate domain.
Once the application is created, click on its name where it appears on the Document Automation Hub account dashboard. You will get to a page that, going forward, this tutorial will call the application page. It shows the client ID; client secret; application URL; and “Code Grant,” “JWT Grant,” “Implicit Grant,” and “Password Grant” tabs.
The next step is to get an authorization code for a Code Grant. A Code Grant is a type of authorization grant that requires the user to agree for you to access user data. It also includes extra verification steps that the client is who it says it is.
Here, you will be accessing data on the park facility’s private workspace, and sending private, legally binding data such as personally identifiable information and eSignatures. This calls for a more secure type of grant. You can read the full documentation for how to get a Code Grant here or watch this video.
You need to use the authorization code to get the bearer token, valid for two days. The request for the bearer token can be copied from the application page. In the request, you must enter the redirect URI, client ID, client secret, and authorization code. Since the first three are copied automatically, the authorization code is the only part you must copy manually.
When you have successfully obtained the bearer token, copy and save the string called access_token which you receive in your response. The access token will enable you to authenticate your Document Automation Hub API requests.
Bug Note: When you copy the URL “Link to get the authorization code” from the application page and enter that URL in the browser, you will be asked to enter a username and password. At that point, you may sign in with another service, such as Google or Apple, to get the authorization code rather than manually entering your username and password. If you do so, then when you use the authorization code to try and get the bearer token, you may get this error — even if you do correctly decrypt the authorization code:
{“error”:”invalid_request”,”error_description”:”The request is missing a required parameter, includes an invalid parameter value, includes a parameter more than once, or is otherwise malformed.”,”hint”:”Cannot decrypt the authorization code”,”message”:”
The request is missing a required parameter, includes an invalid parameter value, includes a parameter more than once, or is otherwise malformed.”}
This error is a known bug. You can avoid it by entering the username and password manually. If you cannot, you should contact airSlate Customer Support, describing the issue, to get proper access.
Creating the Park Facility’s Workspace
Now that you can authenticate, it’s time to build the document automation capabilities using the Document Automation Hub API. First, you will create the park facility’s workspace as an organization that can store and run its own document workflow automation processes.
For one-off requests, the most convenient way to use the Document Automation Hub API is by running it on the production server, on the page of the documentation itself. To create the park facility, go to this “Create a new Organization” page, enter your access_token in the “Token” field of “Auth,” specify that the API request is going to the production server, and enter the following in “Body”:
{
 "name": "Blue Hills Park",
 "subdomain": "blue-hills-park",
 "category": "LEISURE_AND_HOSPITALITY",
 "size": "6-50"
}
On the API documentation page, the request will look like this:

Once you finish forming your request, click “Send API Request.” If the response successfully creates the organization, save the organization ID, which you will use in future requests.
If the subdomain is taken, you will receive a 422 “Unprocessable Entity” error as a response and will need to enter another subdomain. Although the application built in this tutorial uses the subdomain “blue-hills-park,” it should not be a big deal to use another.
The Document Automation Hub API Guide’s pages for specific requests also include the code for making each request in various programming languages — cURL, HTTPie, WGet, Python3, the Requests library of Python, JavaScript, Node, Go, C, Objective-C, OCaml, C#, Java, HTTP/1.1, Clojure, Kotlin, PHP, Powershell, R, Ruby, and Swift. So, you can embed API calls into almost any existing piece of code.
And now, if you go via browser to the subdomain you indicated in your request — for this tutorial, https://blue-hills-park.airslate.com/ — you will see an actual, empty workspace. Time to add some document automation.

Organizations, Templates, and Flows
The workspace is described as the Organization in the API documentation. To enable the document flow automation, you need to make additional Document Automation Hub API requests to create structures within the workspace, which are called Templates and Flows.
A Template is a group of fillable documents and forms that can be sent to recipients for completion. Since Templates require all their forms to be included when they are sent to a recipient, we will create two Templates, one containing the initial booking form and the other containing the waiver form. The waiver form is only sent after submitting the initial booking form.
A Flow is a single run of the standard back-and-forth process for a Template’s documents and forms. For example, each time a person is hired, they might receive a different copy of the standard employment contract. A new Flow might be created for each new hire to send the contract to the new employee and their manager for signature.
We will create a single Flow in the initial booking Template for all users to fill out the form. We will create a new Flow in the waiver Template for each time the waiver form is sent out.
Creating the Templates
The next step is to create the two Templates for holding the Documents. Go to “Create a new Template” in the documentation. Fill in your access_token in “Token” and your organization ID in “organization_id.” For the initial booking Template, send the API request to the production server with the following body:
{
“name”: “Picnic Area Reservations”,
“description”: “Application for reserving picnic area”,
“redirect_url”: “http://localhost:8000/thankyou.html"
}
Make sure the redirect_url is set to the “thankyou” page of the local server you created, where the user will be redirected when the initial booking form is submitted.
For the waiver Template, send the API request to the production server with the following body:
{
“name”: “Facility Use Waiver”,
“description”: “Signable waiver of liability”,
“redirect_url”: "https://www.mass.gov/locations/blue-hills-reservation"
}
Make sure you save both Template IDs for future API calls. Or, you can get a list of Templates in your Organization here.
The Booking Form
In airSlate, it is possible to either create a form yourself or upload and edit a pre-existing form. Forms and other documents can be built or edited in the drag and drop form designer. Forms can also be built using the API, which we will do for the initial booking form in this tutorial.
The API supports the creation of many different types of form fields. We will use several of these, including single-line text, multi-line text, email, phone number, and date.
Go to “Create a web form” in the documentation. Put your access_token in “Token,” your organization ID in “organization_id,” and your “Picnic Area Reservations” template ID in “template_id.”
Replace the sample code in “Body” with the code below, which you can probably just copy and paste. Then click “Send API Request” to the production server. Upon a successful response, save the ID of the form you have created.
{
“name”: “Booking Form”,
“fields”: [
{
“name”: “Picnic Area Reservation Application”,
“type”: “heading”,
“description”: “Thank you for your interest in the Blue Hills Picnic Area! Please fill out this form to reserve it.”,
“title”: “Picnic Area Reservation Application”,
“page”: “page1”
}, {
“name”: “Full Name”,
“type”: “text”,
“title”: “Full Name”,
“value”: null,
“placeholder”: “”,
“page”: “page1”
}, {
“name”: “Billing Address”,
“type”: “text”,
“title”: “Billing Address”,
“value”: null,
“placeholder”: “”,
“page”: “page1”
}, {
“name”: “City State Zip”,
“type”: “text”,
“title”: “City, State, Zip”,
“value”: null,
“placeholder”: “”,
“page”: “page1”
}, {
“name”: “Email Address”,
“type”: “email”,
“title”: “Email Address”,
“value”: null,
“placeholder”: “”,
“page”: “page1”
}, {
“name”: “Phone Number”,
“type”: “phone”,
“title”: “Phone Number”,
“value”: null,
“placeholder”: “”,
“page”: “page1”
}, {
“name”: “Event Date”,
“type”: “date”,
“title”: “Event Date”,
“format”: “MM/dd/yyyy”,
“value”: null,
“placeholder”: “MM/DD/YYYY”,
“page”: “page1”
}, {
“name”: “Event Time”,
“type”: “text”,
“title”: “Event Time”,
“value”: null,
“placeholder”: “12:00 PM-3:00 PM”,
“page”: “page1”
}, {
“name”: “Event Description”,
“type”: “textarea”,
“title”: “Event Description”,
“value”: null,
“placeholder”: “Write a 4–5 sentence description of the purpose of the event, expected attendance, and a summary of the activities.”,
“page”: “page1”
}
]
}
The drag-and-drop form-building features are a bit more extensive. For example, they include formatting the form to display multiple fields in the same row. They can be explored by opening up forms to edit on the Organization workspace. We will also build the waiver form in this tutorial using drag-and-drop.
Building the Waiver Form
For the first time, we are about to build features from within the GUI of the workspace. The workspace GUI is important for airSlate’s document generation and flow automation. Go back to the workspace’s subdomain — here, https://blue-hills-park.airslate.com/.
If you click on “Workflows” in the vertical menu on the left, which will take you to subdomain /templates, you should see the Templates you added. Click “Configure” on the “Facility Use Waiver” Template, as shown.

Once you go to the new page after “Configure,” click on “Add documents” and then on “Form or survey.” You will see a menu on the left with different types of form fields you can add. When you click on the fields on the menu, you add them to the end of the form. When you click on the fields on the form, you can modify them.
Add and modify form fields as follows:
- The heading is already on the form. Change its name to “Blue Hills Park Picnic Area Waiver Form.”
- Add a single line text field “Full Name.”
- Add an email field “Email.”
- Add a date field “Event Date.”
- Assign each of the fillable fields to “Recipient 1,” the person applying to use the facilities, on the menu on the top right. On the menu on the top left, make sure “Recipient 1” is also the person filling out the form.
The form should now look like this.

Next, we will add some more complicated fields, also set for Recipient 1 to fill out. Go down the form field menu on the left and add a “Checkbox.” The checkbox should be called “How will you be using the park?”
It should have two options: “This event will involve building fires in designated firepits.” and “This event will involve the use or extraction of natural resources.” Delete the third option by moving your mouse onto it and clicking the “X” that appears on its right. Just before you delete the third option, the checkbox should look like this.

- Next, go back up the form field menu on the left. Add a multi line text field “If you checked that you are using or extracting natural resources, please describe and explain.”
- Add a Description field. Delete “Type a question” and paste the following text in the text box below it:
I agree to accurately represent the event’s activities in the park and abide by any and all rules set by Blue Hills Park and within this agreement. I agree that I will be responsible for the conduct of my group, which has been granted the use of the above named facilities, and shall conform to the official operating policies as established by the State of Massachusetts, and the Parks and Recreation Department.
I further agree to reimburse Blue Hills Park in full for the fee as agreed upon for the use of a park facility as well as any and all damage to the park facility. This includes but is not limited to: defacing of property, buildings or structures, or the natural state of the facility or park; failure to fully clean the facility, as assessed by the State of Massachusetts Parks and Recreation Department through its agents or employees following my use of the facility.
I, the undersigned, hereby agree to relinquish all claims, suits, attorney fees, damages, liability and any and all future rights to the same based on any and all negligent acts of the State of Massachusetts, the State of Massachusetts Parks and Recreation Department, Blue Hills Park, and any and all of the named agents and/or employees in connection with or incident to myself or my group’s use of any of the park facilities.
- Add Signature and Date fields.
- Rescale the Date field to be the width of the Signature field, and on the same row as Signature. You can do this by clicking once on the Date field and moving your mouse on top of the small circle at the right of the Date field. Your cursor will change into two arrows pointing left and right. Press and hold your mouse, dragging it to the left until the Date field is narrow enough to be on the same line as the Signature field.
- Make the Signature and Date fields required fields. You can do this by clicking on each field, then clicking on the “Required” checkbox on the right menu. Making a field required will make a red star appear next to its name on the form.
Congratulations! You have added all the fields for the applicant. The remaining fields, after the checkbox, should look like this.

However, you are not done creating the form. The remaining part of the form is intended for the park official. The park official will fill out whether the application to book the picnic area has been approved.
Click on the “Assign this field to” dropdown at the top right, where you had assigned the fields to “Recipient 1.” Then click on “+ Add roles.” You will see a popup of the steps in your workflow.
In the popup, click on the “+” below the step with “Recipient 1” and above “Finish.” You will see another step for “Recipient 2” appear. Now click “Apply.”
Create Radio button, Multi line text, Signature, and Date fields as shown in the image below. The steps for creating and editing a Radio button field are similar to the steps for creating and editing a Checkbox field.

We are now finished with the form. Click “Continue” to close the form, and you will see a Workflow in the “Facility Use Waiver” Template.
Connecting the Workflow Steps
Now that we’ve added all the forms, it’s time to connect them and activate them appropriately. airSlate’s specialty is in automating these processes, and so its services have a number of document automation capabilities. This tutorial will illustrate a few of these capabilities.
Embedding the Booking Form on the webpage
The booking form is the first form the user fills out, at index.html. You can obtain the link to embed the form at “Create a link to a Template” here. Enter the IDs of your Organization and the initial booking Template.
In your response, you will receive two URLs. The urls link allows authorized airSlate users to view the form’s settings, although they can no longer edit them once the links have been generated. The urls_embedded link allows the form to be embedded on a public page, as we will do.
Save the urls_embedded link you receive. We will now enter the following HTML code into picnic_area/index.html on your local machine, replacing <Enter your urls_embedded link here> with the urls_embedded link:
<! — MVP.css quickstart template: https://github.com/andybrewer/mvp/ →
<!DOCTYPE html>
<html lang=”en”>
<head>
<link rel="icon" href="https://via.placeholder.com/1x1">
<meta charset="utf-8">
<meta name="description" content="Apply to book Blue Hills Park's picnic area">
<meta name="viewport" content="width=device-width, initial-scale=1.0">
<title>Picnic Area Reservations</title>
</head>
<body>
<iframe id="bookings" src="<Enter your urls_embedded link here>" style="position:absolute;width:95%;height:95%" />
</body>
</html>
Now, when you run the local server and load http://localhost:8000/, you should see the initial booking form filling most of the page.
Activating the Waiver Form
After the booking form is submitted with an email address, the waiver form is emailed to that address. It is later emailed to the park staff member when the applicant has finished their part.
These steps, however, have not been set up. We will do that now.
After you created the waiver form and clicked “Continue,” you should have gone to an editable Flow setup. It would look something like this. Click on “Add autostart” because we are setting the waiver form to get sent automatically.

Click again on “Add autostart” on the popup that appears on the right, and select that you would like to start your Flow “From another Template” or “From another workflow.” Select “Picnic Area Reservations” as the source Template or workflow. Select the step on the “Select a Step” dropdown.
We will pre-fill some fields in this form with fields from the booking form. From the Booking Form source Workflow, select that you would like to import “Full Name,” “E-mail Address,” and “Event Date.” Select that these are mapped onto the “Untitled form” destination workflow, to the fields “singlelinetext1,” “email1,” and “date1,” respectively.
This is a lot, so I’ve given you a screenshot of what you should do. After you change these settings, scroll to the end of the list of settings on the popup that appears on the right because there are more you need to change.

You must trigger the Flow start when the booking form’s email address is not empty. Enter that right below where you indicated the pre-filling of fields, as shown below. Then click on “Apply Changes.” Click “Apply” right after to close the popup.

Next, you will indicate that the form should be sent to the email address the user has filled in as theirs. Click in the text field for the email of Recipient 1 on the Flow, and a tab “+Data variable” will appear. Click on “+Data variable.”

Select that the dynamic variable is from the document “Untitled form” and is “email1”.
When Recipient 1, the person applying to book the picnic area, is finished with their part of the form, the form needs to be sent to Recipient 2, the park official. Click in the text field for the email of Recipient 2 on the Flow, in the step after the one where you indicated Recipient 1’s email.
The tab “+Data variable” will pop up, as in the previous step, but do not click on it. Simply enter the park official’s email. You would probably want to use your own email as the proxy, so you receive the forms.
Customizing the messages
The last step is to customize the email messages the applicant and the park official receive when they are sent the forms to fill out. This can be done in the settings for each step – Recipient 1’s step and Recipient 2’s step in the workflow. The settings can be changed by clicking on the gear in the top right of the box showing the step.
Click the gear, and a menu will appear on the right. For both recipients, uncheck “Revoke access on documents completion” in that menu.
Then click to expand on “Recipient.” For Recipient 1, enter that they should receive an email with the subject “You’re invited to complete the Blue Hills Park Picnic Area reservation application”. Click “Apply.”
For Recipient 2, ensure that the “Recipient” expandable menu section says the email will be sent to the correct address. The subject and body should appear as shown below, using the “Data variable” tab to select the “singlelinetext1” (name) field of “Untitled form.”

Finally, on Recipient 2’s menu settings, you will expand on “Conditions” and make sure this step is set to run when the document data revision status is completed. Click “Apply.”
You might want to run these steps as a test to see whether they work. Finish the application by clicking on “Publish.”
Sweet?

Running the Program
The Blue Hills is a real park in the Boston area, Massachusetts, USA. Let’s imagine you are an instructor at a local university, applying to host a maple syruping party at its picnic area.
When you run the local server and go to its index.html page, you should see the initial booking form. Fill out and submit this form, indicating the email address where you would like to receive the waiver form.

You will be redirected to the “welcome” page. You should also have promptly received an email inviting you to complete the waiver form.

The form in the email will be partly filled out with full name, email, and event date. Complete and sign the form.

Once you have filled out and signed the form and clicked “Complete” on the bottom right, it will be sent to the park official. The subject of the email the park official receives should be “Sigmund Fox has applied to book the picnic area!” and its body should read “Please review and respond to Facility Use Waiver within three business days.”
Completed waiver forms, signed by both the applicant and the park official, can be downloaded from the Organization workspace. On the menu on the left, click “Workflows.” When the workflows appear, roll your mouse over “Facility Use Waiver” and click “Go to documents.” You will see the completed Flows.
For the Flow you want, click on “Download documents” to obtain a PDF copy of the waiver form, as well as a certificate that it has been signed by both parties.
If you’ve gotten to the end of this tutorial and built out the application, congratulations! Here is a picture of the Boston skyline taken from the Skyline Trail of the real Blue Hills.
These are only a few of the many document automation services provided by the API. To learn more, check out the rest of the Document Automation Hub API guide.

The post Forms API: An easy-to-use API for mobile-friendly web forms appeared first on airSlate Blog | Business automation.
]]>The post Building an automated patient onboarding app with APIs appeared first on airSlate Blog | Business automation.
]]>Healthcare document management software streamlines and automates your patient communication workflow, making it easier and more efficient. The patient onboarding process, for example, is essential for taking patients into a healthcare facility and giving them a positive impression. A clunky patient onboarding process can be quite frustrating. However, a smooth and user-friendly digital onboarding process benefits both the patient and the provider.
With digital onboarding, the patient can fill out the form from home, on their own time, looking up required information as needed. They can receive immediate feedback on whether the information is complete and properly formatted. If the provider already has the information, they can help the patient by pre-populating form fields.
To stay competitive, it is becoming increasingly necessary for healthcare professionals to adopt a digital document process. This tutorial will show you how to build basic document workflow automation software and help you understand the importance of document automation in healthcare.
Here, we will build a simplified demo patient onboarding application for Byrd Metropolitan Medical Group, a fictional medical group. We will use airSlate’s Document Automation Hub APIs. airSlate is regularly recognized as a provider of some of the best document automation software.
The Document Automation Hub APIs support various document automation needs, such as dynamically generating documents, enabling conditional workflows, sending forms to multiple recipients, collecting secure eSignatures, and editing PDFs.The full list of functionalities is quite extensive and is in the Document Automation Hub user guide. A few of these document automation tools will be illustrated in this article.
The patient onboarding application
The patient onboarding workflow of this application is as follows:
- Users schedule appointments at Byrd Metropolitan Medical Group through a PDF form on an open HTML page.
- When an appointment scheduling form is submitted, the patient is emailed another form to fill out, where they can provide more medical information.
The application will run on your local machine using Python’s SimpleHTTPServer. To use SimpleHTTPServer, you will need to have Python installed — this tutorial uses Python 3. To use the Document Automation Hub APIs, you will also need a registered Document Automation Hub account.
In the directory of your choice on your local machine, create a folder called patient_onboarding containing two files: index.html and welcome.html. We’re leaving the file index.html blank for now. Later, we will embed the first forms in our document automation process into that page. Submission of that form will redirect you to welcome.html. Put the following code in welcome.html. It’s based on Andy Brewer’s MVP template, and you could probably copy and paste it. Here’s the code:
<!-- MVP.css quickstart template: https://github.com/andybrewer/mvp/ -->

<!DOCTYPE html>
<html lang="en">

<head>
   <link rel="icon" href="https://via.placeholder.com/1x1">
   <link rel="stylesheet" href="https://unpkg.com/mvp.css">

   <meta charset="utf-8">
   <meta name="description" content="Welcome page for Byrd Metropolitan Medical Group">
   <meta name="viewport" content="width=device-width, initial-scale=1.0">

   <title>Welcome! - Byrd Metropolitan Medical Group</title>
</head>

<body>
   <header>
       <h1>Welcome to Byrd Metropolitan Medical Group, and thank you for booking an appointment with us!</h1>
       <p>Check your email for next steps.</p>
   </header>
   <main>
           <!-- Image source: Ashashyou, CC BY-SA 4.0 https://creativecommons.org/licenses/by-sa/4.0, via Wikimedia Commons -->
           <img alt="Thank-you-word-cloud" src="https://upload.wikimedia.org/wikipedia/commons/2/25/Thank-you-word-cloud.jpg" style="display: block;margin-left: auto;margin-right: auto;width: 80%;" />
   </main>
   <footer>
       <hr />
       <p>
           <small>
               Questions? Contact airSlate at <a href="https://www.airslate.com/contact?utm_medium=article&utm_source=blog&utm_campaign=document_automation_hub_api&utm_content=9_2023-Building_an_Automated_Patient_Onboarding_App_With_APIs&utm_term=welcome_page">this link</a>.
           </small>
       </p>
   </footer>
</body>

</html>
In the main patient_onboarding directory, run the local server on the command line. My local machine is a Mac, and my command is as follows:
$ python3 -m http.server
Once the server starts, navigate in your browser to http://localhost:8000/welcome.html.
Now you have some nice pages to embed your forms in and redirect the user to on completion, so we will switch to building the actual document automation processes.
Authenticating with the API
It’s time to set up the API so you can make your first Document Automation Hub API requests. Go to the dashboard of your Document Automation Hub account and create a new application with the “Add Application” button on the top left, as shown below:

The application name is unimportant as long as you remember it. It should also be unique. Here, I’m naming it “Document Automation Hub Demo.” The application URL is even less important for this application, and I’m pointing it to the airSlate domain.
Once the application is created, click on its name where it appears on the Document Automation Hub account dashboard. You will get to a page that, going forward, this tutorial will call the application page. It shows the client ID, client secret, application URL, and “Code Grant,” “JWT Grant,” and “Implicit Grant” tabs. The next step is to get an authorization code for a Code Grant. A Code Grant is a type of authorization grant that requires the user to agree for you to access user data. Because of its extra security, it is the most suitable authorization grant for sensitive patient data. You can read the full documentation for how to get this authorization here or watch this video.
You need to use the authorization code to get the bearer token, valid for two days. The request for the bearer token can be copied from the application page. In the request, you must enter the redirect URI, client ID, client secret, and authorization code. Since the first three are copied automatically, the authorization code is the only part you must copy manually.
When you have successfully obtained the bearer token, copy and save the string called access_token which you receive in your response. The access token will enable you to authenticate your Document Automation Hub API requests.
{“error”:”invalid_request”,”error_description”:”The request is missing a required parameter, includes an invalid parameter value, includes a parameter more than once, or is otherwise malformed.”,”hint”:”Cannot decrypt the authorization code”,”message”:”The request is missing a required parameter, includes an invalid parameter value, includes a parameter more than once, or is otherwise malformed.”}
This error is a known bug. You can avoid it by entering the username and password manually. If you cannot, you should contact airSlate Customer Support, describing the issue, to get proper access.
Creating Byrd Metropolitan Medical Group’s workspace
Now that you can authenticate, it’s time to build the document automation capabilities using the Document Automation Hub API. First, you will create Byrd Metropolitan Medical Group’s workspace as an organization that can store and run its own document workflow automation processes.
For one-off requests, the most convenient way to use the Document Automation Hub API is by running it on the production server, on the page of the documentation itself. To create Byrd Metropolitan Medical Group, go to this “Create a new Organization” page, enter your access_token in the “Token” field of “Auth,” specify that the API request is going to the production server, and enter the following in “Body”:
{
“name”: “Byrd Metropolitan Medical Group”,
“subdomain”: “byrd-metropolitan-medical”,
“category”: “HEALTH_CARE”,
“size”: “0–5”
}
On the API documentation page, the request will look like this:

Once you finish forming your request, click “Send API Request.” If the response successfully creates the organization, save the organization ID, which you will use in future requests.
If the subdomain is taken, you will receive a 422 “Unprocessable Entity” error as a response and will need to enter another subdomain. Although the application built in this tutorial uses the subdomain “byrd-metropolitan-medical,” it should not be a big deal to use another.
The Document Automation Hub API Guide’s pages for specific requests also include the code for making each request in various programming languages. Here is the cURL command for creating Byrd Metropolitan Medical Group’s workspace, for example:
https://gist.github.com/La-comadreja/4cd0ed87c9fba061a1d7bebef5252541#file-byrd_metropolitan_medical_group_curl
Here is the Python3 code to do the same:
https://gist.github.com/La-comadreja/d4fb61b1a63a1786534695b0cae69214#file-byrd_metropolitan_medical_group_python
On the page for each of the API commands, the code for running that command is also available in HTTPie, WGet, the Requests library of Python, JavaScript, Node, Go, C, Objective-C, OCaml, C#, Java, HTTP/1.1, Clojure, Kotlin, PHP, Powershell, R, Ruby, and Swift. So, you can embed API calls into almost any existing piece of code.
And now, if you go via browser to the subdomain you indicated in your request — for this tutorial, https://byrd-metropolitan-medical.airslate.com/ — you will see an actual, empty workspace. Time to add some document automation.

Organizations, Templates, and Flows
The workspace is described as the Organization in the airSlate API documentation. To enable it to have document flow automation, you need to make additional Document Automation Hub API requests to create structures within the workspace, which are called Templates and Flows.
A Template is a group of fillable documents and forms that can be sent to recipients for completion. Since Templates require all their forms to be included when they are sent to a recipient, we will create two Templates, one containing the appointment scheduling form and the other containing the new patient enrollment form. The new patient enrollment form is only sent after submitting the appointment scheduling form.
A Flow is a single run of the standard back-and-forth process for a Template’s documents and forms. For example, each time a person is hired, they might receive a different copy of the standard employment contract. A new Flow might be created for each new hire to send the contract to the new employee and their manager for signature.
We will create a single Flow in the appointment scheduling Template for all users to fill out the form. We will create a new Flow in the new patient enrollment Template for each time the new patient enrollment form is sent out.
Creating the Templates
The next step is to create the two Templates for holding the Documents. Go to “Create a new Template” in the documentation. Fill in your access_token in “Token” and your organization ID in “organization_id.” For the appointment scheduling Template, send the API request to the production server with the following body:
{
“name”: “Schedule Appointment”,
“description”: “Template for scheduling medical appointments”,
“redirect_url”: “http://localhost:8000/welcome.html"
}
Make sure the redirect_url is set to the “welcome” page of the local server you created, where the user will be redirected when the appointment scheduling form is submitted.
For the new patient enrollment Template, send the API request to the production server with the following body:
{
“name”: “New Patient Enrollment”,
“description”: “Template for the new patient enrollment form”,
“redirect_url”: “http://www.airslate.com"
}
Make sure you save both Template IDs for future API calls. Or, you can get a list of Templates in your Organization here.
airSlate’s Voluminous Libraries of Forms
Now it is time to add the forms. The Document Automation Hub API includes a library of over 400 forms for various uses. You can get this full list of forms by making a request to “Get a list of form templates” here, indicating that the response should return 500 results per page. You might want to use cURL to make the request on the terminal so that you can see all the results more easily.
Invoking “Get a list of form templates” generates IDs and other ways to access the forms, which expire in a few hours. You should see the information for the “Online Doctor Appointment Form” and “New Patient Enrollment Form,” two of the simpler forms in the library and the ones we will be using, along with the rest.
In case you were confused, the “Form templates” are not the same structure as the “Schedule Appointment” and “New Patient Enrollment” Templates we have just created. Going forward, we will call the “Form templates” forms when referring to their functionality and documents when referring to their structure. preview_file_url is a PNG preview of the form’s first part and is irrelevant to this tutorial.The forms retrievable from the API are just a few of the tens of thousands of pre-made forms available to airSlate users. airSlate workspaces include US Legal Forms, a complimentary library of over 85,000 legally binding contracts and forms for various purposes. In addition, it is possible to build forms from scratch.
Adding the Forms
When you go to your Organization’s dashboard — here, https://byrd-metropolitan-medical.airslate.com/ — you should now see that it has two Templates called “Schedule Appointment” and “New Patient Enrollment.” For each Template, click on “Configure.”

Once you go to the new page after “Configure,” click on “Add Documents” and then on “Library.” Search for the relevant forms by name in the Library — find the “Online Doctor Appointment Form” for the Schedule Appointment Template and the “New Patient Enrollment Form” for the New Patient Enrollment Template.
When you find the relevant form in the library, click on “Use Form” and watch the form load in a window. For the Online Doctor Appointment Form, select “Anyone” when prompted with “Assign Fields.” For the New Patient Enrollment Form, you can keep that the fields are assigned to “Role 1.”
To edit the form fields, click on them and you will see settings pop up on the right. We are editing the Online Doctor Appointment Form’s “Country” field. Click on that field and scroll down on the settings until you see Options. Enter “USA” and “Canada” as options, and click on “X” to remove the third option.

When you are done editing the form, click “Continue” at the bottom of the window. The form will be added to the Template. You should see an editable Flow setup, which we will revisit later.
Publishing the Online Doctor Appointment Form
The next step is to embed the online doctor appointment form into your application’s index.html. You can obtain the link to embed the form at “Generate a shareable link to a Template” here. Enter the IDs of your organization and the Schedule Appointment Template.
In your response, you will receive two URLs. The urls link allows authorized airSlate users to view the form’s settings, although they can no longer edit them once the links have been generated. The urls_embedded link allows the form to be embedded on a public page, as we will do.
Save the urls_embedded link you receive. We will now enter the following HTML code into patient_onboarding/index.html on your local machine, replacing <Enter your urls_embedded link here> with the urls_embedded link:
<! - MVP.css quickstart template: https://github.com/andybrewer/mvp/ →
<!DOCTYPE html>
<html lang=”en”>

<head>
<link rel="icon" href="https://via.placeholder.com/1x1">
<meta charset="utf-8">
<meta name="description" content="Appointment scheduling for Byrd Metropolitan Medical Group">
<meta name="viewport" content="width=device-width, initial-scale=1.0">
<title>Home - Byrd Metropolitan Medical Group</title>
</head>

<body>
<iframe id="appointments" src="<Enter your urls_embedded link here>" style="position:absolute;width:95%;height:95%" />
</body>
</html>
Now, when you run the local server and load http://localhost:8000/, you should see the Online Doctor Appointment Form filling most of the page.
Setting Up the New Patient Enrollment Form
The last step is to modify the New Patient Enrollment Template’s Flow settings, including setting the New Patient Enrollment Form to be emailed to the user on submission of the Online Doctor Appointment Form.
After you have loaded the New Patient Enrollment Form and clicked “Continue,” you should see an editable Flow setup, as mentioned earlier. It would look something like this. Click on “Add autostart” because we are setting the New Patient Enrollment Form to get sent automatically.

Click again on “Add autostart” on the popup that appears on the right, and select that you would like to start your Flow “From another Template” or “From another workflow.” Select “Schedule Appointment” as the source Template or workflow. Select the step on the “Select a Step” dropdown.
We will pre-fill some fields in this form with fields from the appointment scheduling form. From the Online Doctor Appointment source Template, select that you would like to import “Full Name,” “Phone Number,” “Date of Birth,” and “E-mail Address.” Select that these are mapped onto the New Patient Enrollment Form to the fields “Name,” “Contact Number,” “Date of Birth,” and “E-mail,” respectively.
This is a lot, so I’ve given you a screenshot of what you should do. After you change these settings, scroll to the end of the list of settings on the popup that appears on the right because there are more you need to change.

You must trigger the Flow start when the Online Doctor Appointment Form’s E-mail Address is not empty. Enter that right below where you indicated the pre-filling of fields, as shown below. Then click on “Apply Changes.” Click “Apply” right after to close the popup.

Lastly, you will indicate that the form should be sent to the e-mail address the user has filled in as theirs. Click in the text field for the e-mail of Recipient 1 on the Flow, and a tab “+Data variable” will appear. Click on “+Data variable.”

Select that the dynamic variable is from the document “New Patient Enrollment Form” and is E-mail.

You might want to run these steps as a test to see whether they work. Finish the application by clicking on “Publish”.
Running the Program
When you run the local server and go to its index.html page, you should see the Online Doctor Appointment Form. Fill out and submit this form, indicating the e-mail address where you would like to receive the New Patient Enrollment Form.

You will be redirected to the “welcome” page. You should also have promptly received an email inviting you to complete the New Patient Enrollment Form.

The New Patient Enrollment Form arrives with several of its fields pre-filled, as specified in its Flow.

If you’ve gotten to the end of this tutorial and built out this application, congratulations! Enjoy these lollipops and check out some other features in airSlate’s Document Automation Hub API.
The post Building an automated patient onboarding app with APIs appeared first on airSlate Blog | Business automation.
]]>The post Document generation using API: Create and automate an NDA Flow for a new employee using simple API calls appeared first on airSlate Blog | Business automation.
]]>airSlate has developed Document Automation Hub, a comprehensive suite of workflow automation APIs for organizations whose needs go beyond just eSignature and are looking to fully automate their document processes within their applications. Document Automation Hub seamlessly combines features like PDF editing, document generation, data collection, eSignature, and web forms to potentially transform the development process and boost productivity for technology teams.
airSlate’s workflow automation APIs empower even non-tech-savvy users to integrate document generation functionality into their native software – websites, CRMs, and custom applications. Citizen developers can use well-documented endpoints to create pre-filled documents, distribute them among recipients, and save executed documents to the cloud.
In this article, we’ll demonstrate how your IT professional or System administrator can create and automate an NDA Flow for a new employee using simple API calls.
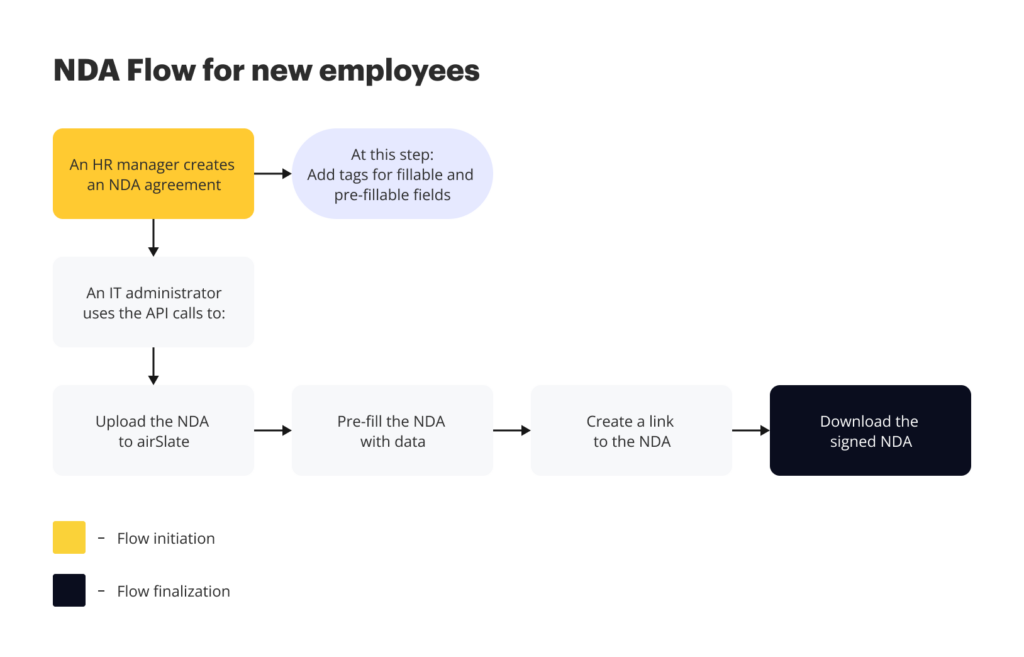
Getting started
To start working with the airSlate API you’ll need to register an airSlate account. Follow the simple process on the homepage, and then log in to the dashboard to create an integration.
1. Create a DOCX with tags
Create a DOCX document in the online editor of your choice (for example, Google Docs) and insert text tags. You can add tags for fillable fields [recipients can enter their data there] and pre-fillable, aka merge, fields [recipients can not edit or modify them].
| Example of text tags for fillable fields | Example of text tags for pre-fillable fields | ||
|---|---|---|---|
| Text field | {{t:t;r:n;l:”text_field_1″;}} | Insert text | {{FieldName}} |
| Signature field | {{t:s;r:n;l:”signature_field_1″;}} | Insert table | {{table}} {{ColumnField1}} {{ColumnField2}} {{endtable}} |
| Initials | {{t:i;r:n;l:”initials_field_1″;w:200;}} | List | {{for(ListName)}} List Element Field1: {{Field1Name}} List Element Field2: {{Field2Name}} {{endfor}} |
| Checkbox | {{t:c;r:n;l:”checkbox_field_1″;}} | Add conditional logic | {{if(ConditionFieldName=‘Value1’)}} Output 1 {{else((ConditionFieldName=‘Value2’)}} Output 2 {{endif}} |
| Dropdown | {{t:d;r:n;l:”Dd_field_1″;dd:first option,second option,third option;w:200;}} | Insert image | {{imageFile(FieldName)}} |
| Date | {{t:dt;r:n;l:”date_field_1″;w:150;p:”DD/MM/ YYYY”;}} | Insert HTML content | {{html:FieldName}} |
Once a document has been generated from a DOCX template, any text tags added to your document are automatically converted into fillable fields or pre-filled with data.
Note: If you add multiple tags for pre-fillable fields with the same name, they will be populated with the same data.
2. Get your access token
Before making API calls, API users need to obtain an access token using one of the available authentication grant types:
- Code Grant
- JWT Grant
- Implicit Grant
Depending on your grant type, make an API request to authorize your application to access the API server.
3. Create an Organization
Once you have your access token, make an API call to create an Organization – an environment where you and your team create documents and forms, manage and collaborate on Templates and Flows, manage user subscriptions, and more.
Note: Organization equals a Workspace in your airSlate account.
Use the POST/organizations endpoint. Once the Organization is ready, you can start your document generation magic.
4. Create a Template
Use the POST /organizations/{{organization_id}}/templates endpoint to create a new Template where you will upload your DOCX file with tags. In the parameters, indicate the ID of the Organization (Workspace) in which you intend to create a Template.
Request example
curl
--request POST \
--url https://api.airslate.io/v1/organizations/{{organization_id}}/templates \
--header 'Authorization: Bearer {{access_tocken}}' \
--header 'Content-Type: application/json' \
--data '{
"name": "NDA",
"description": "DocGen Template"
"redirect_url": "https://www.pdffiller.com/?mode=view"
}'
Response example
{
"id": "7FD5D6C5-8000-0000-0000BA28",
"name": "NDA",
"description": "DocGen Template",
"created_at": "2019-10-10T12:00:00Z",
"updated_at": "2021-10-10T12:00:00-01",
"last_activity": "2019-10-10T12:00:00+05:00"
}
Tip: You can add a redirect link to the API request. With the redirect link, your recipients will be redirected to the website of your choice after completing the document.
5. Upload documents to the Template
Now we will upload a DOCX file with tags to the Template. Use the POST /templates/{{template_id}}/documents endpoint to upload documents. In the request body, indicate DOC_GENERATION as the uploaded document type.
Note: to upload your DOCX via an API request, you need to convert the document’s content to the base64 format using https://base64.guru/converter/encode/pdf.
Request example
curl
--request POST \
--url https://api.airslate.io/v1/organizations/{{organization_id}}/templates/{{template_id}}/documents \
--header 'Authorization: Bearer {{access_tocken}}' \
--header 'Content-Type: application/json' \
--data '{
"name": "NDA.pdf",
"type": "DOC_GENERATION",
"content": "base64 content"
}'
Response example
{
  "id": "28400000-0000-0000-000000F6",
  "name": "NDA",
  "type": "DOC_GENERATION",
  "created_at": "2019-10-10T12:00:00Z",
  "updated_at": "2021-10-11T17:32:28+05:00",
  "fields": [
   {
           "id": "A57C5ABF-DA20-0000-000021F6-0001",
           "type": "date",
           "name": "date_field_1",
           "value": null,
           "placeholder": ""
       },
       {
           "id": "A57C5ABF-DA20-0000-000021F6-0002",
           "type": "signature",
           "name": "signature_field_1",
           "value": null,
           "placeholder": ""
       },
       {
           "id": "A57C5ABF-DA20-0000-000021F6-0004",
           "type": "text",
           "name": "CompanyName",
           "value": null,
           "placeholder": ""
       }
    ]
}
The response returns information about the document and the data array for fillable fields, including the field’s type, name, and ID.
6. Pre-fill your DOCX with data
Use the PATCH /templates/{{template_id}}/documents/{{document_id}} endpoint to pre-fill your document with data.
The request body contains the fields’ data array: field type, field name, and field value (will be pre-filled with the data you need).
Request example
curl
--request PATCH \
--url https://api.airslate.io/v1/organizations/{{organization_id}}/templates/{{template_id}}/documents/{{document_id}} \
 --header 'Authorization: Bearer {{access_tocken}}' \
 --header 'Content-Type: application/json' \
 {
   "fields": [
       {
           "id": "A57C5ABF-DA20-0000-000021F6-0001",
           "type": "date",
           "name": "date_field_1",
           "value": null,
           "placeholder": ""
       },
       {
           "id": "A57C5ABF-DA20-0000-000021F6-0002",
           "type": "signature",
           "name": "signature_field_1",
           "value": null,
           "placeholder": ""

       },
       {
           "id": "003020B9-FA20-0000-000021F6-0004",
           "type": "text",
           "name": "CompanyName",
           "value": "SunnyGlasses",
           "placeholder": ""
       }
    ]
}
Response example
{
   "data": [
       {
           "id": "003020B9-FA20-0000-000021F6-0001",
           "type": "date",
           "name": "date_field_1",
           "value": null,
           "placeholder": ""
       },
       {
           "id": "003020B9-FA20-0000-000021F6-0002",
           "type": "signature",
           "name": "signature_field_1",
           "value": null,
           "placeholder": ""
       },
       {
           "id": "003020B9-FA20-0000-000021F6-0004",
           "type": "text",
           "name": "CompanyName",
           "value": "SunnyGlasses",
           "placeholder": ""
       }
   ]
As a result, the fields in the NDA are pre-filled with the required information.
Tip: With airSlate, you can populate text tags in your DOCX file with content from external sources such as Salesforce, MS Dynamics 365, NetSuite, Google Sheets, MS Excel 365, Airtable, Smartsheet, MySQL, and many others.
7. Create a Flow
Now let’s create a Flow based on the pre-filled NDA to share it with recipients.
Use the POST /templates/{{template_id}}/flows endpoint to create a Flow. The body of the request contains the documents in the Template and an array of fields.
Request example
curl
--request POST \
--url https://api.airslate.io/v1/organizations/{{organization_id}}/templates/{{template_id}}/flows \
--header 'Authorization: Bearer {{access_token}}' \
--header 'Content-Type: application/json' \
--data '{
"documents":[
       {
           "id": "003020B9-FA20-0000-000021F6",
           "fields": [
               {
                   "id": "003020B9-FA20-0000-000021F6-0001",
                   "type": "date",
                   "name": "date_field_1",
                   "value": null,
                   "placeholder": ""
               },
               {
                   "id": "003020B9-FA20-0000-000021F6-0002",
                   "type": "signature",
                   "name": "signature_field_1",
                   "value": null,
                   "placeholder": ""
               },
               {
                   "id": "003020B9-FA20-0000-000021F6-0004",
                   "type": "text",
                   "name": "CompanyName",
                   "value": "SunnyGlasses",
                   "placeholder": ""
               }
           ]
       }
   ]
}
Response example
{
   "id": "FFE6588E-4210-0000-0000C9C1",
   "name": "Anna Green's NDA Flow",
   "status": "ACTIVE",
   "documents_count": 1,
   "available_roles": [
       {
           "id": "A9C880CA-6130-0000-0000055A",
           "name": "Employee"
       }
   ],
   "created_at": "2022-12-27T09:08:30Z",
   "updated_at": "2022-12-27T09:08:35Z",
   "last_activity": "2022-12-27T09:08:34Z"
}
As a result, we get information about the newly created Flow and all available roles with the IDs. We’ll use the role IDs for the next request.
8. Create shareable links to the Flow
Use the POST /templates/{{template_id}}/flows/{{flow_id}}/share endpoint to create a shareable link. In the body parameters, indicate the role ID for each recipient from the previous response.
Request example
curl
--request POST \
--url https://api.airslate.io/v1/organizations/{{organization_id}}/templates/{{template_id}}/flows/{{flow_id}}/share \
--header 'Authorization: Bearer {{access_tocken}}' \
--header 'Content-Type: application/json' \
--data '{
"data": [
  {
    "auth_method": "none",
    "expire": 60,
    "role_id": "A9C880CA-6130-0000-0000055A"
  }
]
}'
Response example
{
   "data": [
       {
           "role_id": "A9C880CA-6130-0000-0000055A",
           "url": "https://redirect.airslate.io/as/flow/4194451a-9b59-4e90-a23a-0452a88ee175",
           "auth_method": "none",
           "is_activated": true,
           "expiration_at": "2022-12-28T02:55:15Z",
           "created_at": "2022-12-27T10:15:15Z",
           "updated_at": "2022-12-27T10:15:15Z"
       }
   ]
}
As a result, we get a link to the NDA Flow.
Note: The number of links depends on the number of roles in a Flow. Each role has a separate shareable link.
9. Share the link with the recipients
Now let’s distribute the link to the Flow with recipients using the available options:
- Embed the link to your Flow into the iframe so that a recipient can open and sign the document on your website.
- Embed the link to the Welcome form and send it via email.
- Share the link via any messenger.
10. Get notified once your documents have been signed
Subscribe to the Flow’s completion event. Use the POST/subscriptions endpoint to create a new event subscription.
In the request, you have to name the event and define the Template ID and callback URL, which will receive the notification about the event completion.
Request example
curl
--request POST \
  --url https://api.airslate.io/v1/subscriptions \
  --header 'Authorization: Bearer {{access_tocken}}' \
  --header 'Content-Type: application/json' \
  --data '{
  "event_name": "NDA.signed",
  "entity_id": "C2D1D654-0100-0000-0000BA40.",
  "entity_type": "template",
  "callback": {
    "url": "http://apicallbacks.pdffiller.com/handle?hash=a75cb8d8"
  }
}'
Response example
{
  "id": "5c74677b-86ed-4d8e-8a0c-38d96ef40c5a",
  "event_name": "flow.completed",
  "app_id": "C2D1D654-0100-0000-0000BA11",
  "entity_id": "C2D1D654-0100-0000-0000BA37",
  "entity_type": "template",
  "created": "2022-03-06T18:12:56.283105Z",
  "updated": "2022-03-06T18:12:56.283105Z",
  "callback": {
    "url": "http://apicallbacks.pdffiller.com/handle?hash=a75cb8d8"
  }
}
11. Download signed documents
Once your recipients have signed documents in the Flow, you can download the documents as an archive. Use the GET/organizations/{{organization_id}}/templates/{{template_id}}/flows/{{flow_id}}/download endpoint.
Response example
curl
--request GET \
--url https://api.airslate.io/v1/organizations/{{organization_id}}/templates/{{template_id}}/flows/{{flow_id}}/download \
  --header 'Accept: ' \
  --header 'Authorization: Bearer {{access_tocken}}' \
  --header 'Content-Type: application/json'
If words are not enough, watch how to generate documents and distribute your Flow via the airSlate API in the video tutorial:
The post Document generation using API: Create and automate an NDA Flow for a new employee using simple API calls appeared first on airSlate Blog | Business automation.
]]>The post How to build dynamic webforms using API: A step-by-step guide appeared first on airSlate Blog | Business automation.
]]>What is airSlate webform builder?
The airSlate’s webform builder allows you to easily create web forms according to your needs. For popular cases, use one of the ready-made templates from the airSlate library to save time. For more specific needs, create unique dynamic webforms by adding your custom fields and parameters. After that, distribute your forms via public links to collect data from your recipients. The entire process occurs right inside the product, and you don’t have to upload documents from servers or cloud storage services.
Here are some examples of workflows you can set up using airSlate’s dynamic web forms:
- Create surveys and application forms
- Collect personal information
- Approve requests
- Sign agreements, purchase orders, and invoices
- Request attachments
- Process payments
- Build quizzes and tests
- Make calculations and much more.
In this blog, we’ll explain how airSlate’s webform API works.
Collecting registrations using airSlate’s dynamic webforms
Let’s look at how airSlate web forms work based on an example. A company is hosting a conference and wants to collect registration information from attendees. Check the diagram below for a bird’s eye view of what the entire workflow looks like.

1. Getting started
Before you start working with airSlate API web forms, you have to pass three basic steps:
- Go to the homepage and log in to the dashboard. There you’ll need to create an integration by following the straightforward process.
- Get your access token to be able to make API calls. The airSlate API supports the following authentication grant types:
- Code Grant
- JWT Grant
- Implicit Grant
- Create an Organization where you will work using the POST/organizations endpoint. Organization is an environment where you and your colleagues generate documents and forms and collaborate on them. In the airSlate user interface, an Organization is equal to a Workspace.
Once in your Organization, let’s proceed with the data collection workflow.
2. Create a Template
Create a Template that will serve as the basis for your forms using the POST /templates endpoint. You’ll be able to add up to 20 forms of your choice to this Template.
Request example:
curl \
--request POST \
--url https://api.airslate.io/v1/organizations/{{organization_id}}/templates \
--header 'Authorization: Bearer {{access_token}}' \
--header 'Content-Type: application/json' \
--data '{
 "name": "Registration Form",
 "description": "Registration form for conference",
 "redirect_url": "https://www.pdffiller.com/?mode=view"
}'
Response example:
{
 "id": "7FD5D6C5-8000-0000-0000BA28",
 "name": "My Template",
 "description": "Template for HR Office.",
 "created_at": "2019-10-10T12:00:00Z",
 "updated_at": "2021-10-10T12:00:00-01",
 "last_activity": "2019-10-10T12:00:00+05:00"
}
3. Create a web form
Select how you want to create your web form according to your needs.
Scenario 1. You want to use a ready-made form template from the airSlate library.
First, you need to get a list of all available form templates by using the GET /templates/{{template_id}}/forms/templates endpoint.
Request example:
curl \
--request GET \
--url https://api.airslate.io/v1/organizations/{{organization_id}}/templates/{{template_id}}/forms/templates \
--header 'Authorization: Bearer {{access_token}} \
--header 'Content-Type: application/json'
Response example:
{
 "data": [
   {
     "id": "7FD5D000-0000-0000-00000029",
     "title": "Registration Form",
     "description": "NEW",
     "preview_file_url": "https://api.airslate.com/v1/download/43A2D9BD-CE40-0000-000045B9?expires=1653865987&signature=b0818ab665421b8b90eb6b9626a68fe7\"",
     "is_active": true,
     "updated_at": "2019-10-10T12:00:00Z"
   }
 ],
 "meta": {
   "total": 10,
   "current_page": 1,
   "per_page": 5,
   "last_page": 2
 }
}
Second, retrieve the form template ID from the response and use it to create a form with the help of the POST /templates/{{template_id}}/forms endpoint.
TIP: To avoid errors, make sure to copy the correct form template ID.
Request example:
curl \
--request POST \
--url https://api.airslate.io/v1/organizations/{{organization_id}}/templates/{{template_id}}/forms \
 --header 'Authorization: Bearer {{access_token}}' \
 --header 'Content-Type: application/json' \
 --data '
{
  "name": "Registration Form",
  "form_template_id": "7FD5D000-0000-0000-00000029"
}'
Response example:
{
 "id": "28400000-0000-0000-000000F6",
 "name": "Registration Form",
 "type": "HTML_FORM_NEW",
 "created_at": "2019-10-10T12:00:00Z",
 "updated_at": "2021-10-11T17:32:28+05:00",
 "fields": [
   {
     "id": "D3D00000-000-0000-000000A6",
     "name": "Input 1",
     "description": "Header description",
     "title": "Header title",
     "type": "heading"
   }
 ]
}
Scenario 2. You want to create a unique form and customize it yourself.
Use the POST /templates/{{template_id}}/forms endpoint as in the first case. The difference is that now you don’t need a form template ID. To create a form with fields, you have to provide an array of fields in the request body. Find a complete list of the fields with JSON examples in the documentation.
Note: If you don’t add fields now, you can do so later (as described in Step 2).
Request example:
curl \
--request POST \
--url https://api.airslate.io/v1/organizations/{{organization_id}}/templates/{{template_id}}/forms \
--header 'Authorization: Bearer {{access_token}}' \
--header 'Content-Type: application/json' \
--data '{
 "name": "Registration Form",
 "fields": [
   {
     "name": "Heading 1",
     "type": "heading",
     "description": "Heading description",
     "title": "Heading title"
   }
 ]
}'
Learn more about what you can do with your web forms in the documentation.
Once your form is ready, send it out for completion.
4. Send out a form
There are two ways to distribute your web form.
Scenario 1. You need to collect information from a public platform.
In this case, create a reusable share link. Every time a new recipient follows the link, a new Flow is generated based on the indicated Template. The link can be used up to 50 times and expires in 30 days. Activate/deactivate it according to your needs using the respective attribute in the request body.
Scenario 2. You need to create custom links for each signer.
When can this be useful? For example, when you’re providing online services and want to collect personal data from your users by embedding links into their accounts. In this case, create a Flow based on a form and share it using one-time links. Keep in mind that as soon as a recipient opens the link, it will no longer be valid.
5. Get notified every time a new form is completed
Subscribe to a Flow completion event to be notified when somebody has completed the form. Use the POST/subscription endpoint and indicate the callback URL to receive notifications.
Request example:
curl \
--request POST \
  --url https://api.airslate.io/v1/subscriptions \
  --header 'Authorization: Bearer {{access_tocken}}' \
  --header 'Content-Type: application/json' \
  --data '{
  "event_name": "NDA.signed",
  "entity_id": "7FD5D6C5-8000-0000-0000BA28",
  "entity_type": "template",
  "callback": {
    "url": "http://apicallbacks.pdffiller.com/handle?hash=a75cb8d8"
  }
}'
Response example:
{
  "id": "5c74677b-86ed-4d8e-8a0c-38d96ef40c5a",
  "event_name": "flow.completed",
  "app_id": "C2D1D654-0100-0000-0000BA11",
  "entity_id": "7FD5D6C5-8000-0000-0000BA28",
  "entity_type": "template",
  "created": "2022-03-06T18:12:56.283105Z",
  "updated": "2022-03-06T18:12:56.283105Z",
  "callback": {
    "url": "http://apicallbacks.pdffiller.com/handle?hash=a75cb8d8"
  }
}
6. Get the list of documents in the Flow
As soon as a new Flow is completed, retrieve the list of documents in the Flow. Use the GET /templates/{{template_id}}/flows/{{flow_id}}/documents endpoint.
Request example:
curl \
--request GET \
--url https://api.airslate.io/v1/organizations/{{organization_id}}/templates/{{template_id}}/flows/{{flow_id}}/documents \
--header 'Accept: application/json' \
--header 'Authorization: Bearer {{access_token}}'
Response example:
{
   "data": [
       {
          "id": "F06B1E91-2530-0000-000021F6",
          "name": "Course Application Form",
          "type": "HTML_FORM_NEW",
          "created_at": "2023-05-30T14:40:15Z",
          "updated_at": "2023-05-30T14:42:23Z"
        }
    ]
}
In the response, we get information about the completed document in the Flow. We’ll need the document ID for the next step.
7. Extract data from the completed Flows
Once you’ve got the needed document ID, use the GET /templates/{{template_id}}/flows/{{flow_id}}/documents/{{document_id}} endpoint to extract data from the Flow. After that, the organizer can use the extracted data at their discretion, for example, entering it into their local CRM or another database.
Request example:
curl \
--request GET \
--url https://api.airslate.io/v1/organizations/{{organization_id}}/templates/{{template_id}}/flows/{{flow_id}}/documents/{{document_id}} \
--header 'Accept: application/json' \
--header 'Authorization: Bearer {{access_token}}'
Response example:
{
 "id": "28400000-0000-0000-000000F6",
 "name": "doc1",
 "type": "PDF",
 "created_at": "2019-10-10T12:00:00Z",
 "updated_at": "2021-10-11T17:32:28+05:00",
 "fields": [
   {
     "id": "D3D00000-000-0000-000000A6",
     "name": "Input 1",
     "description": "Header description",
     "title": "Header title",
     "type": "heading"
   }
 ]
}The post How to build dynamic webforms using API: A step-by-step guide appeared first on airSlate Blog | Business automation.
]]>The post airSlate introduces Document Automation Hub: Enabling developers to access multiple APIs from a unified platform appeared first on airSlate Blog | Business automation.
]]>Document Automation Hub: A unified platform for all your document workflow needs
Developers often find themselves grappling with the complexity of managing multiple, disconnected solutions, subscriptions, portals, and log management systems. These challenges disrupt workflows and create delays in the development process.
Document Automation Hub emerges as a unified platform for all document workflow needs to tackle persistent challenges faced by developers. It offers developers a centralized location to access and automate various document workflow APIs, facilitating smoother scalability and seamless application maintenance.
Document Automation Hub provides best-in-class APIs in a single place, reducing time-to-market and development costs for developers seeking to automate different aspects of their document workflow.
– Borya Shakhnovich, CEO and co-founder of airSlate
Empowering developers with comprehensive API capabilities
Document Automation Hub opens up a world of possibilities for developers, offering a rich array of API capabilities tailored to diverse automation requirements. Let’s explore some of the key features:
- Forms API: Generate dynamic web forms that adapt to user inputs, pre-fill fields with backend data, and deliver a seamless, mobile-friendly experience for document completion and signature across devices.
- DocGen API: Create professional documents using DOCX templates with dynamic fields, eSignature capabilities, iterators, conditionals, validation, custom tables, and pre-filled data using template tags, ensuring unparalleled flexibility and efficiency in document generation.
- Flows API: Empower developers to automate sophisticated workflows with airSlate’s intuitive visual workflow designer, simplifying the process of sending a collection of documents for completion or signature and streamlining document-based processes.
- eSignature API: Seamlessly integrate legally-binding eSignatures into applications, enabling users to send documents for signing, create fillable templates, and effortlessly track the status of documents, optimizing the signing process for businesses and end-users alike.
- PDF Editing API: Embed editing features into applications, empowering users to annotate and make edits to PDF documents without leaving the application, resulting in an enhanced and user-friendly experience.
Existing and new customers can test-drive Document Automation Hub for free – each Sandbox account gets 250 free credits. After that, you can purchase a subscription plan that fits your document workflow automation needs. Large-scale businesses and organizations with unique business models are offered custom pricing plans. Visit Document Automation Hub pricing page for more information on plans and pricing.
Unlocking new use cases with configurable APIs
The true power of Document Automation Hub lies in its remarkable configurability, enabling customers to automate a diverse range of use cases. airSlate is dedicated to empowering individuals and organizations to leverage their robust solutions within applications or websites. This flexibility facilitates seamless data transfer between CRM or ERP systems, opening new possibilities for integration and automation.
For example, developers in insurance or home warranty companies can utilize the Forms API to collect customer details and leverage the DocGen API to create contracts, embed eSignatures, and facilitate signing during an agent’s visit. Document Automation Hub simplifies the entire process, revolutionizing document workflows and accelerating business operations.
Final thoughts
With Document Automation Hub, airSlate continues to empower developers with robust API capabilities, unlocking new use cases and enabling seamless integration into existing systems. By consolidating PDF editing, document generation, data collection, eSignature, and forms into one powerful platform, airSlate empowers developers to scale their applications cost-effectively and maintain them effortlessly. If you have any questions or would like to discuss the Document Automation Hub functionality or terms, contact sales for more information.
The post airSlate introduces Document Automation Hub: Enabling developers to access multiple APIs from a unified platform appeared first on airSlate Blog | Business automation.
]]>The post New airSlate API to empower developers and IT teams to create customized, flexible data integrations appeared first on airSlate Blog | Business automation.
]]>From embedded eSignature to advanced Document Generation, airSlate API is built to scale. Detail-rich documentation and monitoring data keeps you in total control at all times.
If you want to know more about the airSlate API, this article is the best place to start.
We’ll guide you through the capabilities of the airSlate API and provide instructions to help you start integrating automated document workflows in your products.
What capabilities does the airSlate API offer?
The airSlate API provides customizable, scalable document workflow automation solutions for any application or website. From embedded web forms to eSign to document workflows, airSlate’s API is everything you’ll need to create a streamlined user experience within your application. Forward-thinking Developers around the world enhance their app’s functionality with airSlate’s developer-friendly, fully integrated API.
With the airSlate API, you can:
- Generate documents with no third-party connectors required
- Create dynamic HTML web forms to fit your site/CRM/platform perfectly
- Ensure secure authorizations using OAuth 2.0 by default
- Invite an unlimited number of recipients to engage with the documents & forms
Here are some of the most common airSlate API use cases:
- Document generation API – Pre-fill documents with data and use conditional logic when building documents and filling data/text that has varying sizes. Document generation allows you to add logic and insert data snippets of variable sizes to generate a document.
- Embedded HTML forms – Embed forms with conditional logic into a website for data collection or as a questionnaire.
- Embedded Flows – Kick off airSlate Flows from inside any system, push data out, and receive data back to external systems. You can run, upload, and pre-fill any data before running a Flow and collect results afterwards.
How to test the airSlate API for free
The simplicity of the setup process is an indisputable benefit of the airSlate API – no need to contact support or sales representatives to get hands-on experience with the API.
To get started with the airSlate API, you’ll have to register an airSlate account and create a workspace within it. If you already have an account in airSlate, you’re ready to move on to the next step — creating a sandbox. Navigate to the airSlate API page and click on the Create a sandbox button.
Fill out the form and our sales team will reach out to you with the details you need to enable your personal sandbox account.
After requesting a sandbox account, you will receive an email with the access link to the airSlate API. By following the link, you can sign in to the airSlate API dashboard using your credentials for your airSlate account.
A sandbox account will allow you to test the essential API calls completely free of charge. Once you have a grasp of the basic features and functions, you can easily subscribe to a suitable API plan and start building your document workflow integrations. Now, let’s break down the process into a few steps.
Integrate your first document workflow with the airSlate API
In this article, we’ve barely scratched the surface of the airSlate API. Hopefully, it gives you a better understanding of its capabilities and how your own product stands to benefit from them. You can test-drive the airSlate API for free by creating a Sandbox account. If you have any questions or would like to discuss the API functionality or terms, contact sales for more information.
The post New airSlate API to empower developers and IT teams to create customized, flexible data integrations appeared first on airSlate Blog | Business automation.
]]>The post signNow API empowers businesses to integrate eSignature features into any application appeared first on airSlate Blog | Business automation.
]]>In this blog, we’ll walk you through some signNow API use cases based on real-life customer stories. You’ll learn how using signNow’s eSignature API accelerates digital transformation and improves customer experiences across different industries. Let’s get started!
signNow API use cases
The signNow API provides the essential eSignature tools businesses require for digital transformation. The functionality is unmatched and currently sits at a market-leading price point.
Check out how the signNow API helps ISVs grow in a digital marketplace while providing a superior eSignature experience for their end customers.
1. Remote online notarization (NotaryPro)
NotaryPro, a top-rated Notary Public and Commissioner service in Canada, adopted the signNow API in 2021 to enhance their remote online notarization experience and grow their business.
“signNow was part of this journey from the very early days. We looked at different eSigning platforms, but only signNow fit the bill. We got one account and started eSigning online — that was the genesis of our remote online notarization solution.”
— David Barder, Chief Marketing Officer at NotaryPro
By deploying the signNow API, NotaryPro managed to reduce manual work and save time with document templates for notaries. As for customer benefits, they are reaping the benefits of last-minute remote online notarization requests, industry-leading security, authentication capabilities, and much more.
2. Price quotation for Design and Manufacturing (Resero Group)
Resero Group, a global leader in school furniture manufacturing, needed to transition 5,000+ paper-based quotes they reviewed annually to a digital platform.
“It took three or four weeks to go from nothing to up and running, and this is primarily because signNow is really easy to use, even when it is very new. We received about 50 signed quotes in the first four days alone, and the feedback from every user was fantastic.”
— Ben Clist, Applications Developer at Resero
Watch the video below to learn how Resero uses the signNow API for Design and Manufacturing:
3. Software development (NowCerts.com)
NowCerts.com, a software development company that focuses on designing and implementing insurance-related solutions, sought to provide eSigning for their clients and a fully functional document editing and eSignature solution at a low cost.
“Compared to several hundred dollars NowCerts clients may have to plunk in for DocuSign or something like that, or even some of the other ones, they’ll get eSigning cheap if they have 10 million documents. But of course, they don’t. Long story short, signNow’s API is very useful to our clients.”
— Peter Germanov, Principal at NowCerts.com
NowCerts.com was able to easily implement the signNow API and not only provide eSigning for their clients, but a fully functional document editing and eSignature solution at a low cost. New users get the assistance they need for a price that makes signNow the obvious alternative to other eSignature solutions.
4. Healthcare (fertility PRO)
fertility PRO, a cloud-based software services company, provides electronic health records services for the fertility industry.
“We researched all the companies for this feature, and from our perspective, signNow came out head and shoulders above all the others. And after having completed this I would extend that even further in saying that the signNow team has been exceptionally responsive, the API has been great, and we’re extremely happy that we chose signNow as a company.”
— John Butler, the founder of fertility PRO
Additional features of the signNow API
- Easy and fast setup. signNow offers a free Sandbox where users can test the integration and any API-related eSignature workflow for free before going live. It takes no longer than ten minutes to create a free account and begin testing the API integrations.
- Security and compliance. The signNow API uses the OAuth 2.0 protocol for authentication and complies with 21 CFR part 11, SOC 2 Type II, HIPAA, GDPR, eIDAS, and PCI DSS.
- Excellent developer and end-user experience. signNow provides developers with detailed documentation for REST and SOAP implementations, an SDK in five programming languages (PHP, Java, .Net, Python, Node), comprehensive video guides, and solution engineering services. Additionally, the signNow API offers native integrations with Salesforce, Microsoft, and NetSuite.
- Exceptional stability. signNow maintains 99.9% API uptime and superior performance with 24/7 API monitoring.
For more information on the signNow API, its features, and references, please read our ultimate guide to the signNow API and view our detailed documentation.
Looking to get started with the signNow API?
This article appeared on the signNow blog and has been published here with permission.
The post signNow API empowers businesses to integrate eSignature features into any application appeared first on airSlate Blog | Business automation.
]]>